Seam Sealer Tape
This article will go over how to apply seam sealer tape to the seams of your MYOG project. If you look at the back side of the seams on a store bought rain jacket or tent, you will likely see that the seam has been covered with a strip of clear tape. This tape is used to make the seam waterproof. The tape covers the seam, thread, and needle holes preventing water from passing through them.
Note the seam tape on the inside of this poncho hood.
This same method can be used to waterproof the seams of your MYOG gear as well. The tape can be applied at home fairly easily, with a household iron. Using seam sealing tape on your project has some advantages over the other DIY option for sealing seams, which is applying a brush on sealer such as seam grip. (It also has some drawbacks which we will get to in a moment.)
One big advantage is that the tape covers the raw edge of the fabric creating a nice, finished seam. This can make some projects easier because you can use a simpler “semi flat felled” seam to construct the project, rather than the trickier full flat felled seam which encloses the raw edge of the fabric. (In areas where strength is the primary concern, a full flat felled seam may still be the best option.)
Another advantage is that there isn’t the dry time that is associated with brush on sealers. You also avoid some of the downsides associated with brush on sealers, such as that they can be difficult to apply neatly, and dried sealer can attract sand and dirt.
One drawback to using tape for seam sealing is that the tapes that are readily available are meant for PU coated fabrics. They won’t stick to silnylon. This is something to keep in mind when selecting fabric for a project.
Another drawback is that applying the tape to curves can be more difficult than a brush on sealer. Especially on tight curves, practice and patience is required.
The Tape:
Seam sealing tape is a waterproof film with a heat activated adhesive on one side. Most tape meant for single layer PU coated fabrics is translucent white. Tape meant for 3 layer waterproof breathable fabric will have a fabric backer, similar to the backer found on 3 layer fabric. The tape can be purchased by the yard at many of the same places you would find outdoor fabrics for MYOG projects. I have also found full rolls for sale on Amazon.
The Fabric:
As stated before, these tapes are meant for PU coated fabrics, and won’t stick to those that are silicone coated. You can find out what a fabric is coated with by looking in the technical specs for a fabric. The fabric shown in the photos for this article is 1.1oz HyperD PU4000 from Ripstop By The Roll. This fabric has a silicone PU mix coating on one side and full PU coating on the other. In my testing, the tape did not adhere to the silicone/PU side, but it did adhere nicely to the PU side. It is always a good idea to test the compatibility of the tape and fabric before starting a new project.
Applying the Tape:
The tape is applied to the seam using heat from a household iron. The iron needs to be hot enough to activate the adhesive on the tape, but not so hot that it melts or distorts the fabric. I found that the polyester/rayon setting on my iron worked well. It is a good idea to do some tests to determine the best setting. Turn off any steam settings on the iron.
The tape has a layer of adhesive on one side. The adhesive is not sticky until heated, so it can be a little difficult to tell which side of the tape it is on. Look closely at the tape under a light. The side with the slight texture is the adhesive side. If there is any doubt, you can do a test by pressing a piece of tape between two scraps of fabric to see which side sticks.
When applying the tape to a seam, it is a good idea to cover the tape before ironing. This keeps adhesive from getting on the iron and helps protect the tape and surrounding fabric from the direct heat of the iron. Many tutorials recommend using printer paper or parchment paper. In my own use, I’ve found that thin cotton fabric such as muslin also works well, especially on curved seams where it seems to conform to the curve more easily than paper.
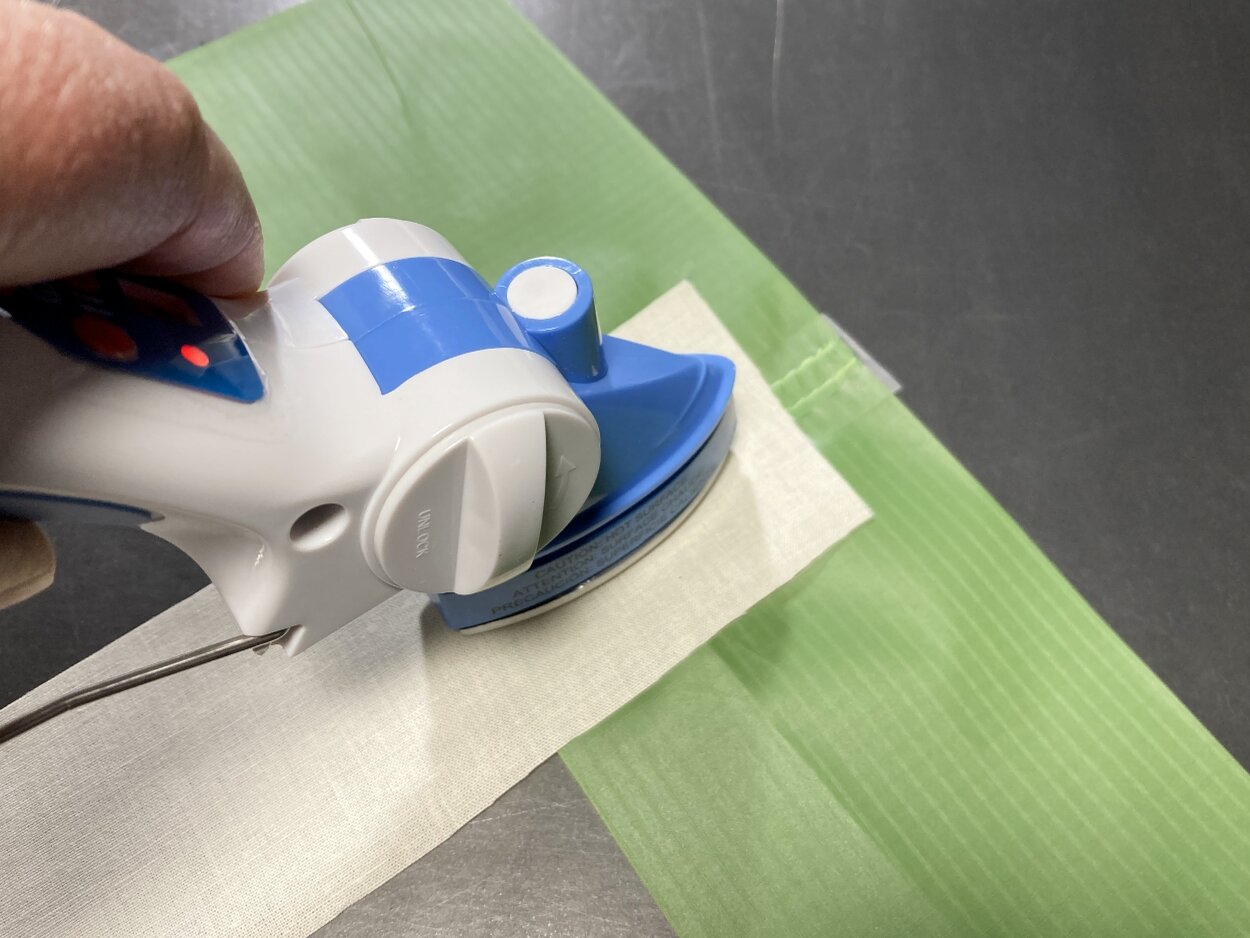
Use a piece of paper or cotton fabric between iron and tape.
Prepare the seam by trimming the seam allowance down to about 1/4” so that the tape can extend past on either side. If using a semi flat felled seam, trim the seam allowance about 1/8” from the second row of stitches as shown in the photo below.
Lay the tape, adhesive side down, over the seam. Cover the tape with a piece of paper or fabric and press with the iron. Leave the iron in place for a few seconds, Applying some pressure with the iron also helps the tape adhere. Remove the iron and check to see that the tape has adhered. Tape that is fully adhered will become clear. If there are spots that are still white or foggy, they can be heated again with the iron. Work your way along the length of the seam until the tape is fully adhered.
Tips and Tricks:
It is generally easier to apply the tape to each seam right after it is sewn, rather than applying it to a finished project.
If you are applying the tape to a seam where the end will eventually be sewn into another seam, ending the tape short of the edge can help reduce bulk where the seams and tape overlap.
If you plan to apply a lot of seam tape, a mini craft iron can be a useful investment. The smaller sole plate makes it possible to apply heat just where it’s needed. It’s easier to control and can fit in tight spaces and around curved seams. The iron shown in the photo below has a sole plate that is 1” wide making it just a bit wider than the tape itself.
Working on a surface that has a small amount of give can be helpful in getting the tape to conform around the stitching and seam allowance. Two or 3 layers of cotton muslin on a hard table has worked well for me.
It is important that there are no wrinkles in the fabric when you apply the tape. If there are, the tape will hold them in place. Getting a straight seam to lay flat isn’t too difficult, but it can be a bigger issue when applying the tape to a curve, such as a collar or sleeve opening. One thing that can help is to lay the seam over something curved. A tailor's ham or a sleeve roll are made specifically for pressing curves, but if you don’t have access to one of those, almost anything that is curved and heat resistant could be used. You can make a makeshift sleeve roll by tightly rolling a dish towel and securing the ends with string.
The tape is flexible and can generally be coaxed to lay flat on a curve, but if you are applying tape to a seam with a tight radius, it may be necessary to cut small clips in the tape so that it can conform to the curve. Just be sure that the tape overlaps itself and that there are no gaps so that in retains its waterproofness.
Related products that we recommend:
The links above are affiliate links. As an Amazon Associate Stitchback earns from qualifying purchases.


